How to Turn Photos into a PDF on Your Phone (Free, No Upload)
You took photos of a document with your phone, and now someone asks you to "send it as a PDF." Or you have several photos and want to hand them in as one file: a school form, an application, a stack of receipts.
This guide shows how to turn photos of documents into an A4 or Letter PDF and combine them into one file, right in your phone's browser. No app to install.
 Private PDF Merge & SplitTurn photos into a PDF and combine as many as you like. Free, no sign-up.Open the tool
Short answer: add your photos, pick a paper size, save
- Open Private PDF Merge & Split in your phone's browser and add your photos.
- Under the photo page settings, choose A4 or Letter, then tap "Save PDF."
- However many photos you add, they become one PDF in the order shown. You can mix PDFs and photos too.
- Your photos are not uploaded anywhere. The PDF is made on your phone, which suits private documents.
Tips for taking clear photos
- Use good light, such as near a window, so the text is sharp.
- Shoot from directly above. Angled shots make the page look skewed.
- Keep your shadow off the page. Standing right under a ceiling light often casts one.
- Use a contrasting background, such as a dark table under white paper, so the edges are clear.
- Crop first with your phone's photo app if the table or your fingers take up a lot of the picture.
How to turn photos into a PDF (iPhone and Android)
1. Open the tool and add your photos
Open Private PDF Merge & Split, tap the button to choose files, and select your photos. You can pick several at once, and iPhone photos (HEIC) work as they are.
2. Choose paper, orientation and margin
- Paper: A4, B5, Letter, or keep the photo's own size. For documents, choose the size the recipient uses (Letter in the US, A4 in most other countries).
- Orientation: "Auto" makes wide photos landscape pages and tall photos portrait pages.
- Margin: none, small or large. A small margin is a safe choice if the page may be printed.
3. Check the order and fix sideways pages
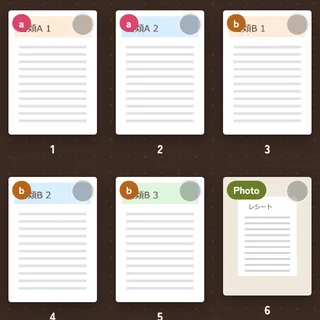
Your pages appear as thumbnails. To reorder, press and hold a page, then drag it. Tap a page to select it, then rotate or delete it. Made a mistake? Use Undo.
4. Save the PDF
Make sure the save mode is set to merge everything into one file, enter a file name and tap "Save PDF." On a phone you can also use Share to send it straight to email or a messaging app.
To add photos to an existing PDF, add both and arrange them. For combining PDFs, see How to Merge PDFs on Your Phone.
Before you send it
Follow the recipient's instructions
Some schools, employers and offices accept photos or PDFs, while others need the paper original. File formats and how to send them also vary, so check their instructions first.
Double-check the recipient and what's in the photo
Documents often show your name, address or date of birth. Before sending by email or a messaging app, make sure you picked the right recipient, and that nothing unrelated, like other mail, appears in the photo.
Zoom in to check readability
Open the saved PDF and zoom in to make sure small text and numbers are readable. If not, retaking the photo in better light is usually the quickest fix.
FAQ
Do I need to install an app?
No. It works in your browser. Built-in options such as "Scan Documents" in the iPhone Notes app can also make PDFs, but this tool is handy when you want several photos on matching A4 or Letter pages in one file.
Are my photos uploaded?
No. Everything happens inside your phone's browser. Once the page has loaded, it even works offline.
How many photos can I add?
There is no fixed limit, but it uses your phone's memory, so around 300 pages in total is a good guide on a phone.
Is it free?
Yes, free with no sign-up, no usage limits and no watermark on your PDF.
Summary
- Add photos, pick A4 or Letter, and save: any number of photos become one PDF
- Good light, straight above, no shadows makes the PDF easy to read
- Check the recipient's rules, and review who you're sending to before you send
Turn photos into a PDFPhotos of documents to an A4 or Letter PDF. Nothing is uploaded.Open the tool
See more free tools on the tools page, or browse PDF articles.
Checked on November 6, 2026 against the tool's settings and help text.
If you find any errors, please let us know via our contact page and we will correct them.